


Web Hacking Approach using Burp Suite
- Jun 11, 2017
- 10 min read
Basically, for Black Box or Gray Box Pentester's often need to define their scope while testing for a web application.
Web application URL's
IP addresses
Admin or Non-admin
Database type that's being used by the application (ORACLE, MySQL, etc.)
Now, lets see the differences between Burp Suite Free and Professional.
In Burp Suite Free:
Most of the Burp Suite's Pro functionality is enabled in Burp Suite Free
The Intruder functionality is less throttled when compared with Burp Suite Pro
Payloads are not available in Free version
Some of the plugins are also not available for free edition
In Burp Suite Professional:
All the Burp functionality tabs are enabled
We can adjust throttle level in Pro version
All the Portswigger payloads are available in Burp Suite Pro
Discover content and CSRF PoC's are available in Pro version
The creation of our project file is only supported in Burp Suite Pro.
Step 1: Create Project File
Creation of a project file in Burp Suite is only available in Pro version
1. First, create a folder where you want to save the burp projects on your computer
2. Go and start Burp Suite Pro
3. When you start Burp Suite, you will be presented with the below screen
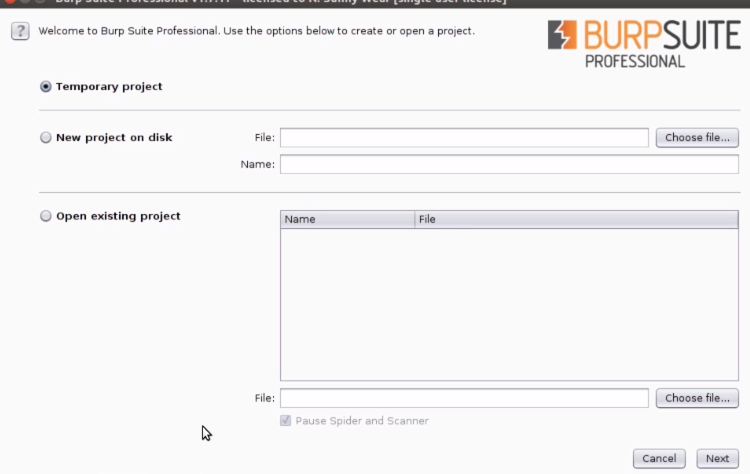
4. Select the second option "New project on disk" and choose a file which you have created a folder to save the Burp projects. Name the project file with any name you want with .burp file extension and click on "Next". See below

5. After clicking on next, you will presented with another screen with two options "Use burp defaults" and "Load from configuration file". Select the first option and click on "Start Burp". See below

6. When you start Burp, the name of your project file will be shown in the Burp Suite title bar. See below

7. The major use of your project file is what ever interactions you do with your target application will be automatically saved.
Step 2: Configuring Options in Proxy, Spider and Scanner tabs
In order to customize instances of our target application we need to do this step.
Setting options in Proxy tab:
1. Go to Proxy tab and click on Options
2. Use the default proxy listeners set in the Burp Suite

3. Now scroll down to "Intercept Server Responses" and check box the "Intercept responses"

4. Again scroll down to "Response Modification" and check box the "Unhide hidden form fields", so that the burp will show all the hidden parameters in the request find more vulnerabilities.

5. Leave the rest of the options as it is in the Proxy tab > Options
Setting options in Spider tab:
1. Go to Spider tab and click on options
2. Scroll down to "Spider Engine" and we can either increase or decrease number of threads depending on how much your operating system can handle. Better set it to "5"
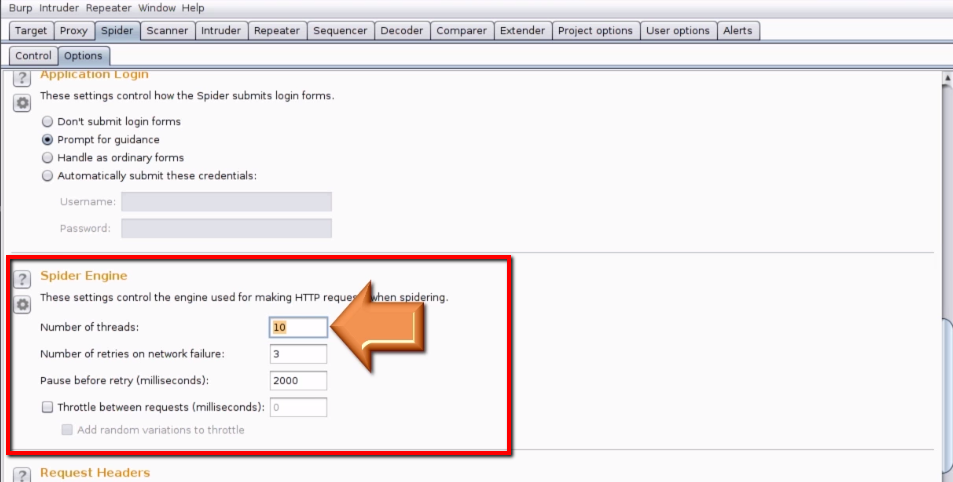
3. Leave the rest of the options as it is in the Spider tab > Options
Setting options in Scanner tab:
1. Go to Scanner tab and click on options
2. Scroll down to "Attack Insertion Points" and check box the "URL path name" and "URL path folders"

3. And also check box the "URL to body" and "Body to URL". By setting this any POST request can also be sent as GET request (there is a chance of finding vulns by doing this).

4. Scroll down to "Active Scanning Engine" and set the number of threads to "5"

5. Again scroll down to "Active Scanning Optimization" and set the scan speed to "Thorough". This is a very important setting because you'll get the accurate results.

6. Scroll down to "Active Scanning Areas" and click on "Select all"

7. Leave the rest of the options as it is in the Scanner tab > Options
Step 3: Scoping your Target
When you open the saved burp project in Burp Suite. You can see some unwanted links listed in the Targets tab

To get rid of this, we can narrow down our scope by right clicking on the target link and selecting "Add to scope"

You can see that the target scope is successfully added to the scope.

Now click on the "Filter" ribbon

Select the check box "Show only in-scope items" and also check box the "4XX [request error]" in "Filter by status code"

Click any where on the Burp Suite, now you can see the Target site map gets cleaned up

Step 5: Spidering the Target
There are three types of spidering. Automated, Manual and Hybrid. Hybrid spidering is a techniques which uses both automated and manual spidering features.
The reason to use Hybrid spidering approach on the target web application is because now a days many web applications use many client side technologies stack like HTML5, Anugular JS, Bootstrap, Node JS, etc,. Because of this heavy client side technology stack we need to perform manual spidering.
Manual spidering can be performed by human interaction with web application like clicking buttons, interacting with text boxes, and clicking each and every possible links of the target web application
First we are going to do is to create an account and then login to the application and click on every possible options available for the user.
Then set the scope of the target
Then spider that target scope
And then finally save it as the session state file.
1. Use the burp project file which you have saved in your projects folder.
2. Login to your target web application
3. Now perform your manual spidering by click all the buttons, links, tabs and text boxes, search boxes and all the possible interaction with the web application.
4. You can see that in the Burp Target scope, the site map is created based on the interaction you have done on the web application

Look at all the paths of the target web application in order to get any sensitive paths available publicly to the users.
5. To perform automated spidering, right click on the target application and select "Spider this host"

6. After the spidering is done, you need to save this session state in your projects folder. To do this go to Burp menu and then select "Save state"

7. Select "Save in-scope items only" and click on "Next"

8. Leave all the default settings as it is and click on "Next"

9. Select the first option and click on "Next"

10. Give a name to your session state file and click on "Save"

11. The burp session state will be saved and you can open this file when ever you want to resume the test again.
Step 6: Test for Privilege Escalation
To test for Privilege Escalation with Burp Suite. First you need to have both admin and user credentials.
Login to admin account and browse all the tabs in the account. Run the Burp Spider and save the session state in your local computer.
Login to user account and do the same as you did in admin account and save the session state in your local computer by using different name.
1. Now run the Burp Suite Pro, select the admin session state file and go to Targets tab. Right click on the target URL and select "Compare site maps"

2. Select the first option "Use current site map" and click on "Next"

3. Use the default options set, check box "In-scope items only" and click on "Next"

4. For site map 2, select option "Load from Burp state file" and click on "Next"

5. Load the user session state file which you have saved in your local computer previously and click on "Next"

6. It will take some time to perform the comparission
7. Once the loading completed, check box the "Include in-scope items only" and click on "Next"

8. Leave the default settings in "Request Matching" and "Response Comparison" and click on "Next"


9. You can now visually compare both the site maps together, as shown below

10. Look closely through both the site maps and compare that whether the low privileged user is able to access the admins' account URL's or any thing else.
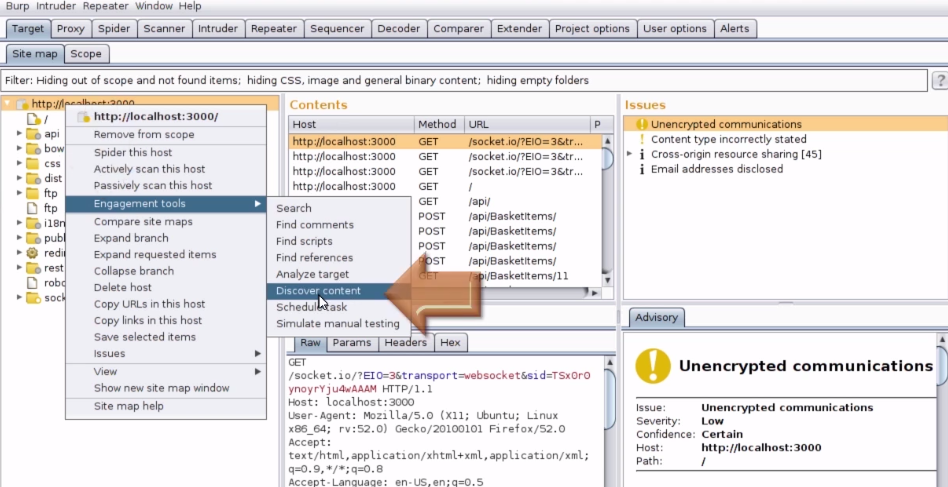
Step 7: Directory Brute Force
To discover all the hidden contents or hidden path folders of the web application by using Burp Suite Discover Content feature.
1. First go the site map in Target tab and right click on target URL and select Engagement tools > Discover Content
2. Now under the "Config" tab, you can load your custom wordlist's to the burp to get the valid directories in the web application.

3. Go to the "Control" tab and select "Session is not running". Now the session will get started.

4. Now go to "Site Map" tab, you can now view the results for directory brute forcing.

Step 8: Scanning the target
Since our target web application was already scoped and spidered, we can now directly perform active and passive scan
1. Go to Target tab and right click on the target web application and select "Passively scan this host"

2. After finishing the passive scan, again go to Target tab and right click on the target web application and select "Actively scan this host"

3. A scan wizard will pops up. Click on Next and Next again to start the active scan.
4. For both the scans you can view the scanned results in Scanner tab > Scan queue

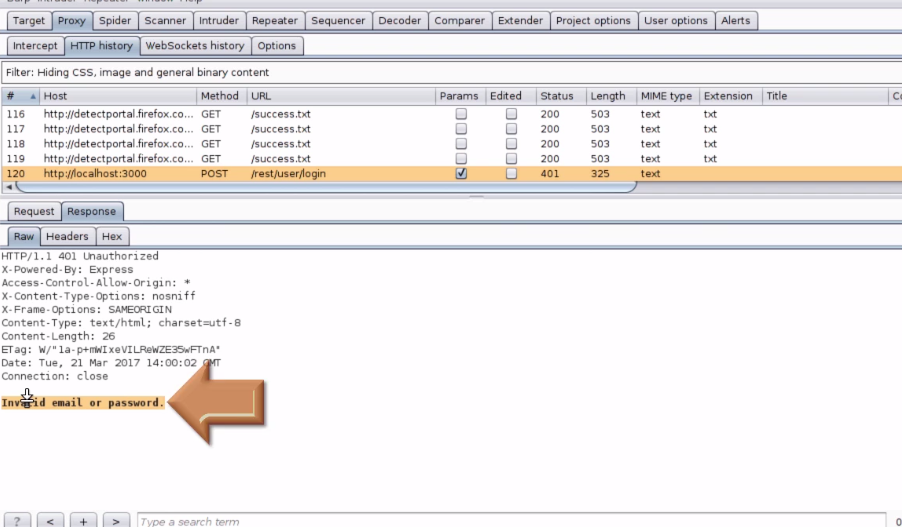
Step 9: Test for SQL Injection
To perform SQL injection using Burp Suite first you need to wrong attempt the login page of the web application (Make sure that the burp suite is running and listening in the back ground)
1. Go to Proxy > HTTP History and look for the request you made.

2. Copy the error message from the response tab, which we are going to use it in Intruder
3. Send the vulnerable request from Proxy tab to Intruder by right clicking on the request and select "Send to Intruder"
4. In Intruder > Positions tab clear all the selected values and add only email parameter value.

5. Now go to the Payloads tab and load the custom wordlist which was created on your local computer.
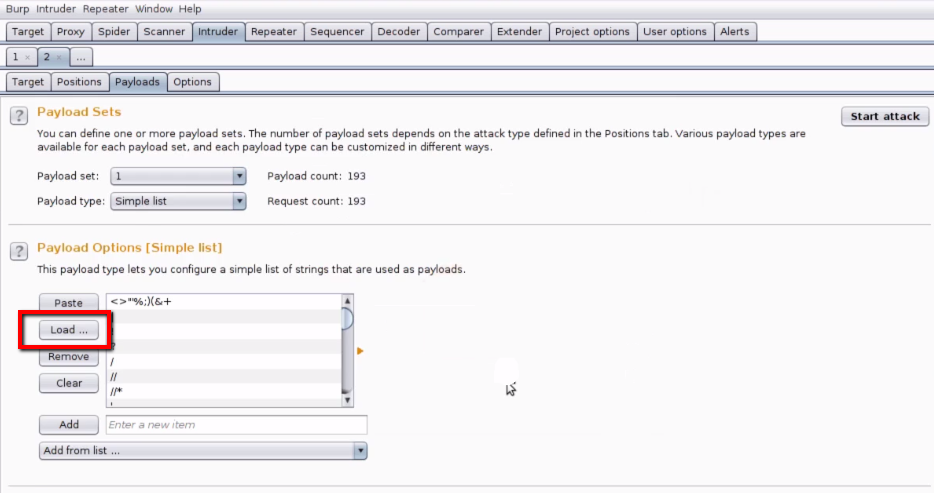
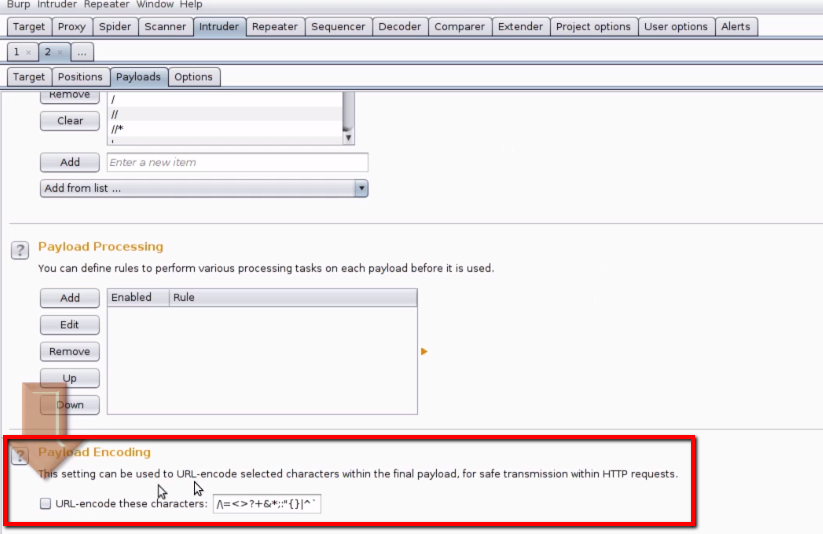
6. Scroll down and go to "Payload Encoding" and uncheck box the "URL Encode these characters". This very important because the payloads will be inserted into the request without encoding.
7. Go to Options tab and scroll down to "Grep-Match" and clear all the default messages and paste the message we have copied to the clipboard and click "Add". As shown below.

8. Scroll down and go to "Redirections" and select the option "In-scope only" and check box the "Process cookies in redirections"

9. Now go and click on "Start Attack"

10. Now toggle the status bar on the intruder to get all the 200 OK responses and no error responses. Those are the request where we have actually exploited our SQL injection attack.

11. Now you can repeat the same procedure for the password field by selecting the password parameter field in the Intruder Positions tab.
Step 10: Test for XSS
There are multiple types of tests to find out XSS, here is the basic one:
1. Go and register an account on the target web application
2. Capture the request in Burp Suite

3. Now replace your mail ID with XSS payload and forward the request.

4. The XSS will be successfully executed in your browser.
Step 11: Test for IDOR
Finding IDOR's are very easy unless your observation of the request is 100%. Below are some of the examples:
1. Login to any shopping site and add some products to your basket.
2. Click on "View basket" from your profile and capture the request by using Burp Suite

3. Assume that your user account number is "4", now change the user account number from "4" to "1" and forward the request.

4. You can now successfully view the basket of the user account number "1"
5. There is an another example, where you can submit feedbacks using other user account ID's
6. Fill the Feedback form on your target web application and click on submit. Make sure to intercept the request by using Burp Suite.

7. Now change the userId number from "8" to "1" and forward the request.

8. You have now successfully submitted the feedback on behalf of the victim.
Step 12: Test for JSON Injection
To test JSON injection attack, follow the below procedure:
1. Login to your target web application and select any product.
2. You can get the request by going to Proxy > HTTP History tab.

3. Send the above request to the Burp Repeater and forward the request in the repeater. The response you get is the JSON response.
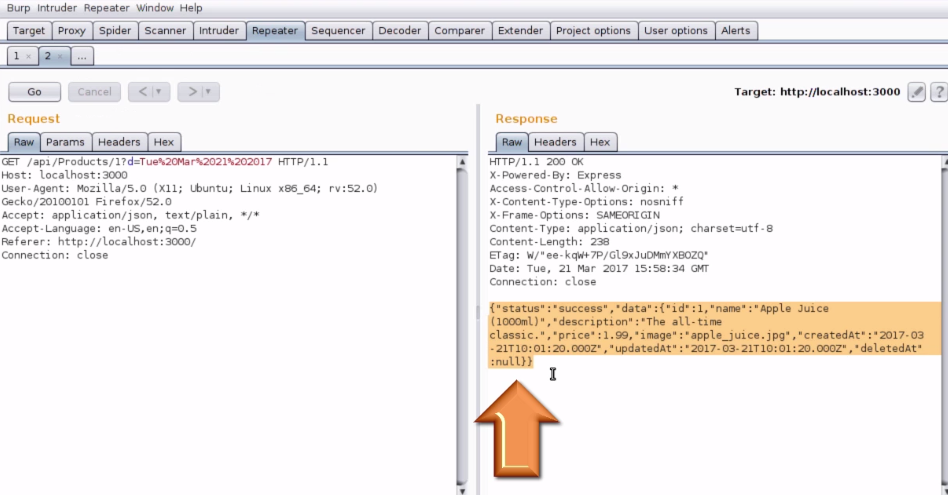
4. We can now manipulate the GET method to PUT method in order to put something inside the database. Remove the additional parameter in the URL (i.e, ?d=Tue%20Mar%2021%202017)

5. Now copy the "Content-Type" header from the response and paste it in the request message header.
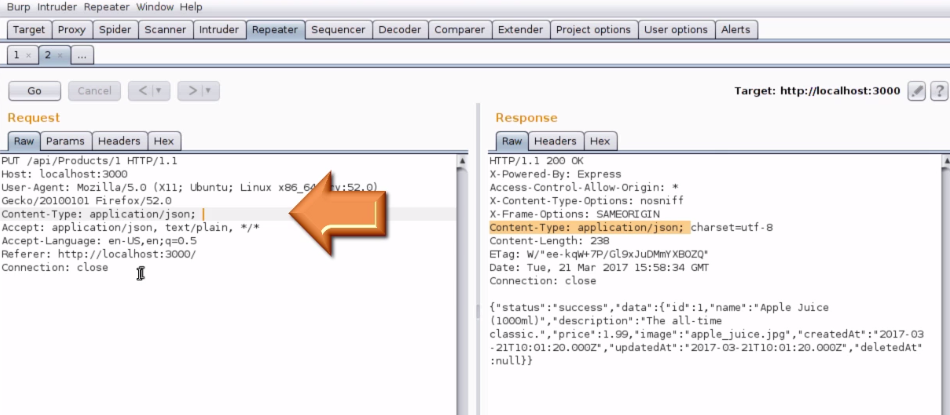
6. Copy the JSON response message body and paste it in the request message body and remove the unwanted variables which are not necessary.

7. Now place the XSS payload in the "description" parameter and forward the request.

8. You have now successfully exploited the stored XSS vulnerability.
Step 13: Test for CSRF
To test for CSRF vulnerability using Burp Suite, follow the below procedure.
1. Login to your target web application and go to "Change password" field and fill the required information.
2. To test for the CSRF vulnerability, remove the token and forward the request. If you get the same response as like the response with the token, then it is vulnerable for CSRF attack.

3. There is an another way to find the CSRF vulnerability by using Burp CSRF POC. Right click on the vulnerable request and go to Engagement tools > Generate CSRF POC. The PoC will be generated and click on "Test in Browser"

4. Copy that link and paste it in the browser. Click on "Submit Request". Now you can view the same response.

5. Now lets try the CSRF PoC in a different way. Right click on the vulnerable request and select Engagement tools > Generate CSRF PoC. Now remove the current password and generate the PoC.

6. Test the PoC in your browser. Now the password will be successfully changed. Because the token and current password fields are not properly validated on the server side.

Step 14: Test for ClickJacking
To test for ClickJacking using Burp Suite. Please follow the below instructions:
1. Go to Burp Menu > Burp Clickbandit

2. It gives you a wizard, click on "Copy Clickbandit to clipboard" and copy the code.

3. Go to your browser and press F12, which opens the "Console" in your browser. Paste the code in the console and click enter.

4. Now at this point Clickbandit is enabled and will record all the clicks you do in your browser to detect any malicious iFrame can be injected. Now click on all the tabs available on the web application.

5. Now click on "Finish" so the Clickbandit will be stopped.

6. Now anywhere you see the red box, then it is considered as it is vulnerable for ClickJacking (a malicious iFrame can be inserted).

7. After completing, you can also save the results.

If you like this blog. Please do share. Knowledge should be FREE. :)
Comments